Quick OpenGL setup on CodeBlocks with freeglut
A quick start to setting up OpenGL for CodeBlocks. First, we will download everything and later we will setup our first OpenGL project on CodeBlocks.

Downloading…
Step-1: Download CodeBlocks.
First, you download CodeBlocks from this link -
http://www.codeblocks.org/downloads/binaries/
Under the Binary releases, you can download according to your Operating system. I have windows 11, 64bit, hence I downloaded: codeblocks-20.03mingw-setup.exe from FossHUB
Step-2: download freeglut.
This is the main freeglut website:
https://freeglut.sourceforge.net/
Download the latest freeglut from this link. It is under the ‘stable releases’ section.
Setup Project
Step-1: install CodeBlocks by running the “codeblocks-20.03mingw-setup.exe” program.
Step-2: unzip/extract your “freeglut” zip file wherever you like. I usually don’t download or keep anything in my C: drive.
Now go to the “bin” folder inside the “freeglut” folder. Then go to the “x64” folder. Copy the “freeglut.dll” file.
Go to your C:drive or the drive where you have your operating system, which is usually in C:drive. In your C:drive there is a folder “windows”. inside “windows” you paste the “freeglut.dll” file.
Step-3: go to the “freeglut” folder. Then go to the “include” folder where there is a “GL” folder. Copy all the files inside the “GL” folder (there are files like freeglut.h, glut.h, etc).
Now go to the folder where you downloaded CodeBlocks. On my PC, my CodeBlocks folder is in,
C:drive > program files > CodeBlocks
Inside this folder, follow this directory ( directory means the path or the folders inside folder direction),
CodeBlocks > MingGW > x86_64-w64-mingw32 > inlcude > GL
Inside CodeBlocks’s “GL” folder, you paste all the files you have copied from your freeglut’s “GL” folder.
NOTE: Sometimes some Youtube videos will show that they don’t have “x86_64-w64-mingw32 “ folder. So they paste the files into the “include” folder in this directory,
CodeBlocks > MingGW > include
Step-4: go to the “lib” folder of “freeglut” folder. Copy the files (not the folder “x64”).
Go back to the lib folder of CodeBlocks in this directory,
CodeBlocks > MingGW > x86_64-w64-mingw32 > lib
Paste the files you have copied from the “freeglut” folder’s “lib” folder.
Again, go back to the “lib” folder of “freeglut” folder. Go inside the “x64” folder. Copy all the files. Again go back to the “CodeBlocks”’s “lib” folder. Paste those files there as well.
NOTE: You may not have “x86_64-w64-mingw32 “ folder. So you can paste the files in the “lib” folder in this directory,
CodeBlocks > MingGW > lib
Step-5: for this step, you will need a text editor on your PC/laptop. You will need to edit two files in this directory,
C:drive > Program Files > CodeBlocks > share > CodeBlocks > templates
Look for the file “glut.cbp”, then right-click on it and open it with “Visual Studio Code” or “ NotePad++”( these are text editors for coding ). If you don’t have them, you will need to download one of them. I am opening with a VSCode(Visual Studio Code).
After opening the file, press on your keyboard: Ctrl + F (for VSCode)
This will let you search for any word or anything in the whole file. If you click on the left “>” arrow, you will get the option to replace those words with something else.

Now write “glut32” in the search/find box and then write “freeglut” in the replace box and click the right-most button “ac”. This will replace all the “glut32” words with “freeglut” in the whole file. In VSCode you will get notified while trying to save the file after editing. You must choose “Retry as Admin..”
Step-6: we are going to replace all the “glut32” words with “freeglut” in the “wizard.script” file. You will need to open this file with a text editor as well. You can find this file in this directory,
C:drive > Program Files > CodeBlocks > share > CodeBlocks > templates > wizard > glut
The same happens when trying to save the file after editing, choose “Retry as Admin..”
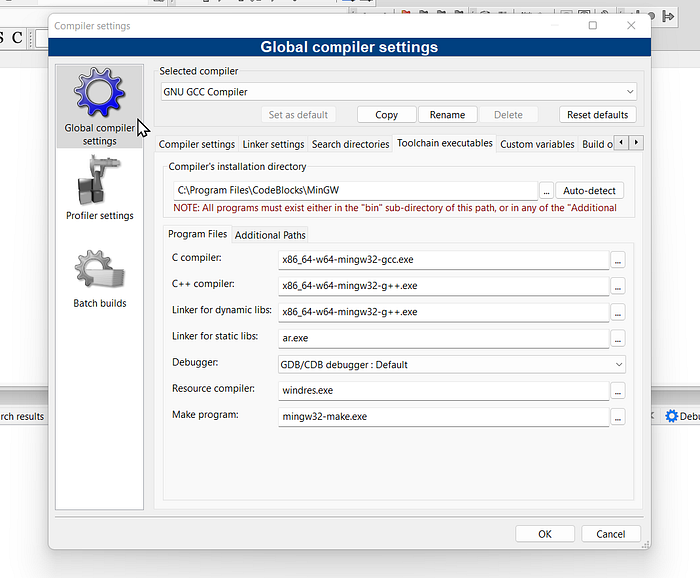
Step-7: Now comes the most crucial part in my opinion. We need to configure the settings inside CodeBlocks.
Open Codeblocks. On the topmost bar, select ‘settings’, and then click ‘compiler’. Here, under the ‘selected compiler’ section you will see there are many tabs. Click on the tab ‘toolchain executables’. Here you will need to change or check many things:
In the ‘compiler’s installation directory’ set the path,
C:\Program Files\CodeBlocks\MinGW
Below that section in the ‘program Files’ tab change the followings:
For ‘c compiler’ select — “x86_64-w64-ming32-gcc.exe”
For ‘c++ compiler’ select — “x86_64-w64-ming32-g++.exe”
For ‘Linker for dynamic libs’ select — “x86_64-w64-ming32-g++.exe”
Step-8: now we create a project. Click on the ‘file’ tab in the top-most bar and then select ‘new’ and then ‘project’. Now select, “GLUT project”. After that name your project. Then comes a critical section. You have to set the path to your GLUT location. Select the path to your CodeBlocks Glut path,
C:\Program Files\CodeBlocks\MinGW\x86_64-w64-mingw32
Then click next and make sure you have the right compiler selected. After this just one more thing to do, click on the ‘“sources” folder and open ‘main.cpp’ file. Inside the ‘main.cpp’ file you must include the ‘windows.h’ header file in the beginning. Write,
#include<windows.h>
Finally, the project is READY!! You have created your first OpenGL project using “freeglut”.
I have other posts regarding OpenGL, you can check them too.